
Phytoremediation
Aim of the study
The lasts weeks we're studying the water sewage treatment, now we’re working on the third treatment studying the nutrient removal; we want to extract the copper (Cu) with the Lemna Minor plant which is called phytoremediation. Knowing this , our principal objective is to extract the cooper and then study the (cooper 2+) absorbance using colorimeter methodology.Materials:
- Lemna minor plant
- Erlenmeyer flask
- Test tubes
- Water
- Balance
- Cooper 2+
- Calibrated Cylinder
- Watch glass
- Pipets
- Colorimeter
- Volumetric flask
- Plugs
- Spatula
- Gloves
- Test tubes rack
Methedology:
 First of all, we have to prepare 10 different concentrations of the copper solution from a more intense solution to a more translucid one. Every seven days we have to check it.
Then, we add a plug to each Erlenmeyer (after that we cleaned them).
We do some tables with the variables for the Erlenmeyer off 150 mL and 100 mL. Then we do the same but with 5 test tubes whit their plugs.
We have checked our experiment with an app called toolbox to complete the colorimeter.
 We prepare dissolutions with the data that we have in the graphic to put then the plants. we add the V into the flashed after that V of water to complete the 150mL and 100mL
When we finished that we put the plants into a recipient with water. We evaluate and write the colors of the concentration of sulfur and water that we put it last week.


We prepare in a calibrated cylinder and prepare the concentration of copper solution and water necessary with 100 cubic centimeters and 9 cubic centimeters in the test tube.

Each number of each group had a different number of concentration, starting in 0,25, then 0,125, followed by 0,0625 and ending with 0,0313. There was also a last one but that was all water.
Once we made that we could classify and verify the changes easily only checking the concentration and the Flask.
The first week of the project we saw this tones of color and the respective number of the color for each substance on the flask or graduated cylinder:
First week:
0,25 dodger blue 0B81BB
0,125 cadet blue 51A3B0
0,0313 light sea green 0CA4AC
0,0625 dark sea green 80B7A9
Second week:
0,25 dark slate gray 1F4034
0,125 dark olive green 575B29
0,0313 dark slate gray 265433
0,0625 dark slate gray 1B553A
Third week:
0,25 dark slate 0E534B
0,125 aquamarine 4A7363
0,0313 dark slate gray 3A6650
0,0625 sea green 3A6E59


We do some tables with the variables for the Erlenmeyer off 150 mL and 100 mL. Then we do the same but with 5 test tubes whit their plugs.
We have checked our experiment with an app called toolbox to complete the colorimeter.
 We prepare dissolutions with the data that we have in the graphic to put then the plants. we add the V into the flashed after that V of water to complete the 150mL and 100mL
When we finished that we put the plants into a recipient with water. We evaluate and write the colors of the concentration of sulfur and water that we put it last week.


We prepare in a calibrated cylinder and prepare the concentration of copper solution and water necessary with 100 cubic centimeters and 9 cubic centimeters in the test tube.
Colorimiter:
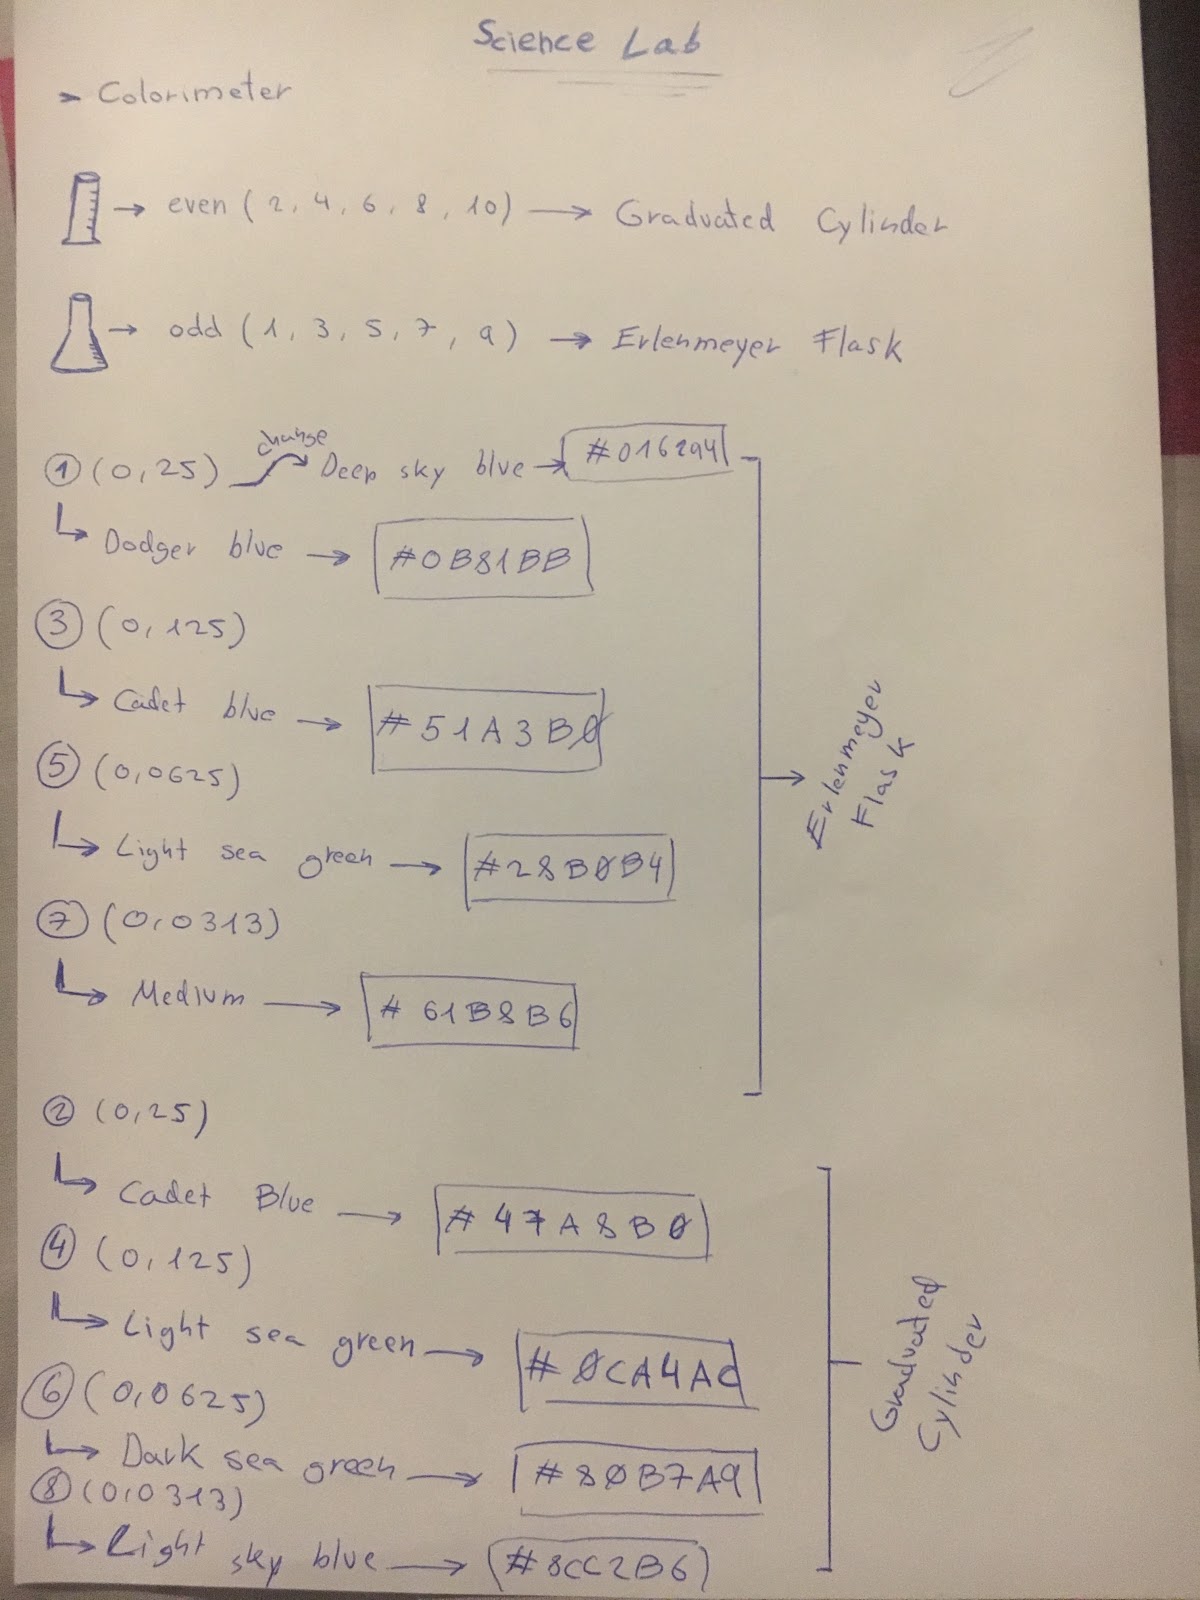
In this project we also had to check the colors of each substances to see if the solution was changing and filtering all the copper with the plants. To classify it we divided it in two groups the even ones (2,4,6,8,10) which were Graduated Cylinders, and the odd (1,3,5,7,9) that were the Erlenmeyer Flasks.
Each number of each group had a different number of concentration, starting in 0,25, then 0,125, followed by 0,0625 and ending with 0,0313. There was also a last one but that was all water.
Once we made that we could classify and verify the changes easily only checking the concentration and the Flask.
The first week of the project we saw this tones of color and the respective number of the color for each substance on the flask or graduated cylinder:
First week:
0,25 dodger blue 0B81BB
0,125 cadet blue 51A3B0
0,0313 light sea green 0CA4AC
0,0625 dark sea green 80B7A9
Second week:
0,25 dark slate gray 1F4034
0,125 dark olive green 575B29
0,0313 dark slate gray 265433
0,0625 dark slate gray 1B553A
Third week:
0,25 dark slate 0E534B
0,125 aquamarine 4A7363
0,0313 dark slate gray 3A6650
0,0625 sea green 3A6E59
We saw that the Erlenmeyers color were slightly clear than the graduated cylinders ones, that was because the concentration of the even was more scattered than the odd that was more compact, seeing different tonalities of colours on the respective two.
We can observe at the 3 charts the volume of the flask and of the water are opposite.
That have done? To start with, we know that the initial concentration will be always 0.25.
Released, has to compound the total volume.
How we view at the table, to compound the volume of the flask with different concentrations, has to divide for the same numeral that has divided the concentration. And the volume of the h20, compounds doing the less total volume the volume of the flaskwith the same concentration that is compounding . This procedure carries out with the sample of the test tubas, with differentiates it that it divides for more numerals.
An important aspect is that the sum of the volume of the flask and of the h20, always will give as a result the total volume.

Conclusions:
The conclusions that we extract of this experiment are the following ones, we had to
repeat several times since we released more plants than normal, I also think that we would
have focused and the experiment would have been better, since there were people who
did not know what do.
Finally, the improvements we would make would be as follows, better organize the tasks
so that no one is left without doing anything.
Activity 11: Phytoremediation
 Reviewed by Anonymous
on
January 06, 2019
Rating:
Reviewed by Anonymous
on
January 06, 2019
Rating:
Reviewed by Anonymous
on
January 06, 2019
Rating:


No comments: